Instead of manually trading appointment times over text, send a Calendly booking link from your VirtualText conversation so the customer can choose an available slot. This guide covers that link-based booking workflow first, then explains what you must verify before adding automated booking confirmations in 2026.
- Start your Calendly text message booking integration with a booking link sent through VirtualText.
- Calendly manages appointment availability; VirtualText handles the customer conversation and shared team inbox.
- Sending a scheduling link does not automatically sync bookings back to your inbox.
- Verify supported connections before automating appointment confirmations, cancellations, or reminder texts.
Why this matters
A customer asking for an appointment should not need to exchange several messages about availability. A scheduling link moves that decision to Calendly, while your team keeps the surrounding questions in VirtualText.
VirtualPBX's VirtualText is best for small service teams that need SMS and webchat conversations in a shared inbox. Calendly serves a different purpose: it lets customers select appointment times against your configured availability.
The useful connection starts with a handoff, not a promise of automatic synchronization. Your team sends the link, the customer books, and someone verifies the resulting appointment. For the wider lead-handling process, see the guide to converting website visitors into booked jobs with chat.
In 2026, document which system owns each action before introducing automation. Calendly should control appointment availability; your messaging process should control who replies and what happens when a customer needs help.
Before you start
- Account access: Have access to your VirtualText inbox and permission to configure the relevant Calendly event. Identify the teammate who owns that appointment calendar.
- Booking materials: Prepare the correct event link, appointment description, working hours, and a customer-facing message. Use an internal test contact before sending the workflow to customers.
- The gotcha: A booking link does not create a return connection. Do not assume VirtualText receives booking status, Calendly receives the customer's SMS number, or either system matches conversations automatically.
This walkthrough uses a link-based handoff that does not require a native connector. Automated confirmations require a separate, verified connection with the necessary booking data and a supported messaging action.
Keep credentials separate from customer messages. A customer needs the public booking link, never an account invitation, administrator link, or authentication token.
Choose the booking workflow
Start with the smallest workflow that solves your problem. Use the comparison below to distinguish sending a booking link from building an event-driven connection.
| Workflow | Best for | Advantage | Limitation |
|---|---|---|---|
| Link-based handoff | Teams introducing text-to-book scheduling | Customers choose a slot without a connector | Staff must verify the booking and update the conversation |
| Event-driven automation | Teams with verified booking and messaging connections | Booking events can drive follow-up actions | Requires supported access, contact matching, and duplicate controls |
Use the link-based handoff first. It separates scheduling problems from integration problems and gives you a working customer journey to test.
VirtualText combines SMS, webchat, a shared inbox, and an AI agent. That supports conversation handling, but those features alone do not establish a Calendly connector. Likewise, a Calendly booking page does not establish permission to send automated texts.
For your 2026 setup, record the handoff's limitation explicitly: sending the link is not the same as confirming an appointment. Keep that distinction in staff instructions and customer messages.
Calendly event configuration
Prepare the appointment customers will book
- Open the Calendly event intended for this service. Choose a specific appointment purpose rather than sending customers to an unrelated event.
- Set the appointment duration to match the work you offer. For a test example, use 15 minutes for an introductory call or 30 minutes for a consultation; these are configuration examples, not recommended service lengths.
- Review the calendar connection and availability used by that event. Block time that must remain unavailable, including internal meetings and time away from work.
- Check the appointment location. State whether the meeting happens by phone, online, or at a physical location, as appropriate to your service.
- Review the booking questions. Ask for enough information to identify the customer and prepare for the appointment, without collecting unnecessary sensitive details.
- Use Calendly's Copy link control for the relevant event. Open the copied link in a signed-out browser session and confirm that it shows the intended appointment.
Expected result: The public link opens the correct booking page, displays the intended duration and location, and offers times consistent with your availability.
Test from the customer's perspective. An administrator can recognize an event from its internal name; a customer needs a clear description of what they are booking.
Check time zones as well. The customer-facing date and time must make sense to the person booking, especially when your team serves customers outside its local area.
Keep the link tied to the right service
Use a simple internal mapping between the customer's request and the event link. A consultation request should receive the consultation link, not whichever link a teammate last copied.
For multiple locations, identify the location before sending the link. Otherwise, the customer can complete a valid booking with the wrong office or employee.
Do not use a general scheduling page to hide an unresolved routing decision. Decide who should receive the appointment first, then send the appropriate booking destination.
VirtualText booking handoff
Send the booking invitation
- Open the customer's conversation in your shared inbox. Read the latest messages before offering an appointment.
- Confirm the service and location the customer needs. Resolve questions that determine which Calendly event applies.
- Paste the verified booking link into your reply. Introduce it with a short explanation of the appointment's purpose.
- Explain that the customer must choose a time and complete the booking page. Do not describe the appointment as booked merely because you sent the link.
- Tell the customer how to get help if the available times do not work. Keep that help path in the existing conversation.
- Identify the teammate responsible for checking the completed booking and answering follow-up questions. Use your established inbox ownership process.
Expected result: The customer receives a clear booking invitation, and your team knows who is responsible for the next action.
Suggested message wording follows. It is a draft for your team to adapt, not an existing company message:
Choose a time for your consultation using the booking link below. Complete the booking page to reserve the appointment. If none of the times work, reply here and our team will help.
Paste your actual event link after that text. Avoid sending a bare URL without explaining what the customer should do with it.
Keep one conversation owner
The shared inbox helps your team see customer messages together. Its operational benefit disappears if several teammates independently send booking invitations or answer the same scheduling question.
Choose an owner before the handoff. That person checks whether the appointment was completed and handles questions about timing, location, or preparation.
One customer request should have one responsible teammate, even when several people can see it. Shared visibility is useful; duplicate replies are not.
Booking verification and launch testing
Verify the complete customer journey
- Send the booking invitation to an internal test contact using the intended customer channel.
- Open the link from the receiving device. Confirm that it works without access to your staff accounts.
- Complete a test booking with recognizable test details. Check the appointment in Calendly and the connected calendar.
- Match the booking to the original conversation using the information actually collected. Do not assume a phone number carried over from the text message.
- Update your team's conversation record through the process available to you. Distinguish a verified booking from an unanswered invitation.
- Run 3 test cases before launch: a completed booking, a canceled booking, and a customer who replies without booking.
Expected result: Your team can identify what happened in each case and take the correct next action without guessing.
The link-based workflow has four stages: Customer request, Booking invitation, Calendly booking, and Staff verification. The last stage remains a staff responsibility unless you establish a verified return connection.
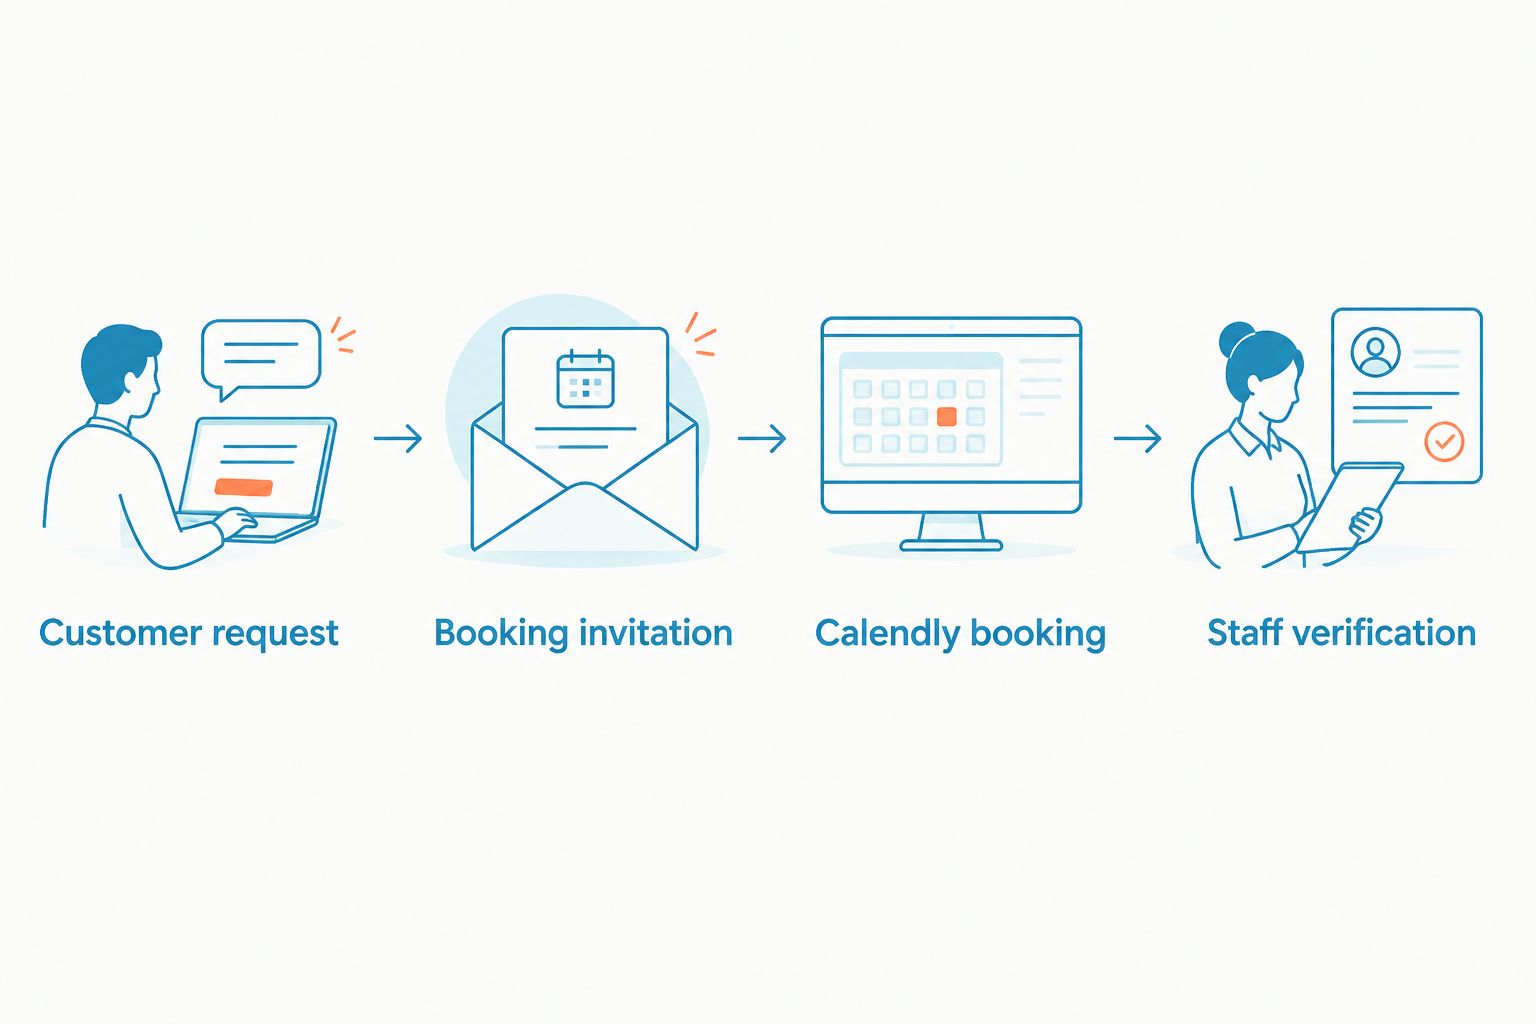
For your 2026 launch record, save the event used, the test outcome, and the person responsible for follow-up. These details make later changes easier to check without relying on someone's memory.
Do not use live customer information for avoidable testing. Use your internal contact and remove test appointments when the checks are complete.
Second workflow: follow up when a booking changes
A second workflow starts after the appointment exists. Instead of sending a booking invitation, it responds to a new booking, cancellation, or reschedule.
Build this workflow only after confirming the necessary connections. The required chain is a booking event, usable customer identification, and a supported way to send the intended message through your messaging system.
Before configuration, confirm these requirements with the relevant product documentation or support team:
- The booking system exposes the event you need through a supported connection.
- Your messaging setup supports the action you intend to perform.
- The event includes enough information to match the correct customer.
- You have an appropriate basis to send that customer the message.
- You can distinguish a new appointment from a cancellation or reschedule.
Once those requirements are met, configure the workflow around the appointment's identity rather than its date alone. Dates change when customers reschedule; the workflow still needs to recognize which appointment the update concerns.
Prevent repeated processing from sending the same confirmation again. Keep a record of which event has already produced a message, and test what happens when an event arrives more than once.
For cancellations, stop pending appointment-specific follow-ups. For reschedules, use the replacement appointment time and retire the outdated reminder schedule.
The guide to connecting VirtualText to Zapier is the next place to examine connection requirements. Do not treat an integration guide's existence as proof that every trigger or messaging action is supported in your account.
Troubleshooting
The link opens the wrong appointment
Replace the copied link with the correct event link and test it from a signed-out browser. Check the service, employee, and location before sending another invitation.
Keep approved links in your internal service mapping. Do not rely on a teammate remembering which event name matches each customer request.
Calendly offers unsuitable times
Review the event's availability, time zone, and connected calendar. Check that the calendar carrying your busy time is the one used to determine availability.
Repeat the customer-facing test after changing settings. An internal calendar view alone does not verify what the public booking page offers.
The customer booked, but the inbox shows no update
In a link-based workflow, that is not evidence of a broken connector. The link sends the customer to Calendly; it does not establish a return synchronization path.
Have the assigned teammate verify the booking and update the conversation record. Add automation only through a connection you have confirmed and tested.
The appointment cannot be matched to the text conversation
Check which identifying information the booking page collected. A text conversation's phone number does not automatically become a booking field.
Collect appropriate identifying details and resolve uncertain matches manually. Never send appointment information to a contact based only on a similar name.
A canceled appointment still receives a follow-up
Check whether a cancellation stops the pending message. A workflow that handles new bookings but ignores cancellations is incomplete.
Pause the affected automation until the cancellation path passes testing. Then test a reschedule separately, because a changed time also makes an old reminder inaccurate.
Customize your workflow
Expand the workflow only after the basic handoff works. Add service-specific event links, clearer appointment instructions, or a defined escalation path for customers who cannot find a suitable time.
For after-hours inquiries, explain the next step without implying that a booking exists. Your AI agent's instructions should distinguish offering a booking link from verifying a completed appointment.
VirtualPBX remains the parent brand; VirtualText is the messaging and shared-inbox offer relevant to this setup. Keep the booking workflow centered on customer conversations rather than treating a phone-system change as a prerequisite.
Before adding scheduled follow-ups in 2026, define what happens after a reply, cancellation, or reschedule. A reminder should reflect the current appointment, not an earlier version of it.
FAQ
How do I connect VirtualText to Calendly for booking?
Start by sending a verified Calendly event link in a VirtualText conversation. The customer completes the booking in Calendly, and your team verifies it; automatic updates require a separate supported connection.
Do I need an integration platform to text a Calendly booking link?
No integration platform is needed for the link-based handoff described here. Copy the public event link and send it through your existing customer messaging process.
Does sending a Calendly link automatically confirm an appointment?
No, sending a Calendly link is an invitation to book. Confirm the appointment only after the customer completes the booking and you verify the resulting record.
Will Calendly automatically receive the customer's text message number?
Do not assume the customer's SMS number transfers with the booking link. Check the information collected by the booking page and any verified integration before using it for contact matching.
Can I automatically text customers when they book or reschedule?
Automated texts require a supported booking event, a supported messaging action, and reliable customer identification. Verify those requirements before configuring confirmations or reschedule messages.
What should I do if a customer cannot find an available appointment?
Keep the customer in the existing conversation and have the responsible teammate help. Check the event's availability and offer a valid next step without promising an unverified time.
Is this Calendly text message booking integration a two-way sync?
The link-based workflow is not a two-way sync. It hands the customer from a conversation to a booking page; returning booking status to the inbox requires a separate verified connection.
Can I include sensitive customer information in booking texts?
Keep booking texts limited to necessary scheduling information. For VirtualPBX's VirtualText workflow, confirm your organization's privacy and compliance requirements before including sensitive details or using automated messages.
One last thing
A customer replying with a preferred time is not the same as a completed booking. Your team needs a verified appointment record before treating that time as reserved.
Make that distinction part of your 2026 staff instructions. It prevents a conversational agreement from being mistaken for a calendar commitment.